Patio Cover Installation Instructions W Pan and Flat PanImportant Note: It would be impossible for us to have different installation instructions for every application. We have put together these assembly instructions together showing a typical, straight foward install. This will work for most settings however, if you encouter difficulties or need clarification concerning installation, please call us 1 888 814-7531
Do you offer installation services?
We do not offer installation services but do provide installation instructions for most kits that we sell. We have sold and installed most of our kits for over 20 years in the San Antonio area and are here to assist you if you run into any problems. We offer free phone assistance from people who have actually installed the product.
 | Attach two Outside corners to Back Gutter Fascia- Determine if you will be attaching to the house wall or eave
- Cut back fascia / gutter piece to length ( if needed)
- Find where the rafters (eave attachment*) or studs (wall attachment) are located on the house.
- Mark on the back fascia where the attachment points are and drill holes in the fascia for the attachment screws (wood) or drive pins (masonary). Your back fascia should attach to the house at least every 24".
- Caulk outside corner piece as shown (only caulk the side of the corner piece you will be attaching to the back fascia for now). Slide the corner piece onto the back fascia and screw together with sheet metal screws in pre-punched holes. Repeat for other side of back fascia
*(for eaves with a backward slope, you may need to cut an angle out of a 2x4 and screw to your eave to give you a flat mounting serface.)
| |
|
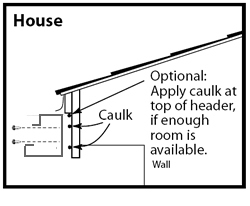
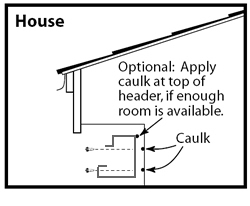
| Attach the gutter fascia to the eave or to a wall. This fascia carries half of the covers load so attach it securely. - Mark on the back fascia where the attachment points are and drill holes in the fascia for the attachment lag bolts (wood) or drive pins (masonary). Your back fascia should attach to the house at least every 24".
- Run two beads of caulk along the back surface of the gutter fascia where it will meet the existing building or fascia board.
- If attaching to a masonary wall, use two 1/4" diameter masonry anchors every 12" on center. (Special fasteners for attaching to brick or other non-wood surfaces are not included should be purchased locally. )
- Raise the fascia to the attachment point and fasten one end to the house. (Make sure screws go into rafters or studs at least 1 1/2")
- Place a long level in the center of the fascia, raise the end not fastened until it is level then fasten to house.
- Continue fastening to every rafter, stud or every 12" OC.
 House Eave Attachment image House Eave Attachment image- House Wall Attachment image
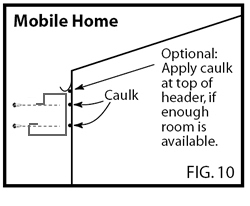
- Mobile Home Attachment image
 | |
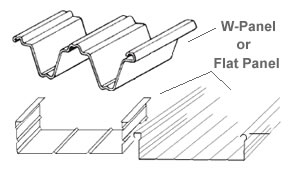
|  | Get Ready for Panel Installation- V Panel, W Panel and Flat Panel are positioned and installed in the same manner
- Place marks on the front and back fascia in the proper panel increments to keep from misaligning panels - an extra inch is included on the first mark to allow for the side fascia. (24" panel installation shown)
| |
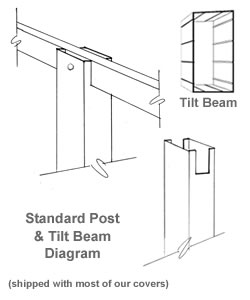
| | Building Frame and Attaching Posts
(there are several methods for installing the unit - see diagram at left for proper attachment of posts to beam or fascia)
- Option 1: Cut posts and attach to beam or fascia
(A)This option will require careful measuring to achieve the proper slope (at least 6") for water drainage and making sure the front of the patio cover is level.
(B) Post brackets (post on slab) should be set in place or holes dug (post in ground).
(C) Measure and cut the posts and front support beam. MEASURE CAREFULLY to achieve the proper slope (at least 6") for water drainage, making sure the top of the beam is level. Attach beam to posts. Raise beam and posts into post holes or onto brackets. Temporarily brace in place.
(D) Attach side fascia to front and back fascia, check the frame's square and make sure it is level then proceed to install roof panels. - Option 2: Use temporary supports in place of posts to support the frame during assembly. We recommend 2" x 6" lumber or 4" x 4" wood posts in order to cut down to make your frame level at the front with proper slope.
(A) Attach the front, back and side gutter fascia together and brace in place with the temporary supports.
(B) Level and square the unit, then cut posts and/or beams to fit.
(C) Attach posts to frame and secure to brackets or in post holes then proceed to attach the roof panels. - This picture shows the post and beam in place. In this case it is at the panel’s length (projection) less 1' to create a 1' overhang.
- Support Post should be sunk in the ground 2' and set in concrete or attached to the patio slab using brackets and fasteners provided.
- See beam attaching pictures for the different types of beams and their uses.
There are several methods for installing a patio cover. Select one, or a combination of methods that suit your particular installation scenario the best.
| |
|  | Panel Installation- Recheck the square on all fascia frame.
- With lock side of panel facing side fascia, drop end of first panel into fascia (A) and slide in to stop.
- Lower Panel (B) onto lip of opposite fascia.
- Move panel (C) so that front end of panel hangs over the inside lip of front fascia (this allows water to run into the front fascia).
- Move panel (D) so that female side of lock is against wall of fascia (see panel to gutter diagram).
| |
|  | Panel Attachment- Position panel using the marks you made earlier as a guide.
- Attach panel to side fascia, front and back fascia. Leave off the last screw attaching the male lock to the fascia.
- Temporarily tack another panel onto the opposite side of the cover to keep the frame square and rigid.
| |
|  | Install remaining roof panels - Once your first panel is attached place your second panel into position.
- Important: After placing each panel into position to lock with previousely laid panel, check to be sure the panel ends are even with each other. After the panels have been locked together it is difficult to slide the locked panels for adjustment,
- V and W panels usually snap together by pushing down the female onto the male lock.
- Flat panels: position panel in place to the installed panel. Raise free end up and so the female lock fits into the male lock. Lower panel into place and attach.
- Use your marks to align panel and attach panels together and to facia.
- Repeat procedure until all panels have been installed. (last panel may have to be trimmed to size depending on the width of your cover.)
Note: These are general installation guidelines for locking the panels into place and may not be the exact procedure for installing the panels on your patio cover.
| |
|  | Scupper / Downspout - Flashing - Scuppers are supplies with all units, optional downspout kits may be used instead of scuppers.
- Cutting holes and attaching scuppers on the bottom of the fascia/gutter may be easier done before the fascia is attached. however, they can be easily installed after the unit is up. One scupper / downspout per 100 square feet of cover is sufficient.
- Flashing (purchase at local hardware store) and caulking is required at the attachment points to prevent leaks. Flash at gutter and house wall.
| |
|  | Grab a cold beverage, throw a few steaks on the grill, settle in a nice relaxing chair and enjoy your new patio cover. |
|