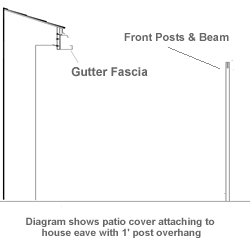
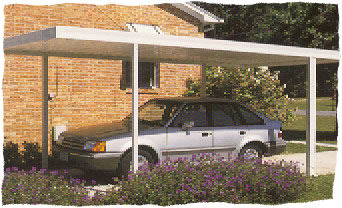
Installers Note: I have provided instructions for the easiest way to put up your single attached carport without having special jack stands that most professional installers use. You should be able to put this cover up in one day with just yourself and one helper. To avoid measuring mistakes, I suggest fitting the gutter framework together on the ground and put in place to get proper measurements for digging your post holes. These installation instructions refer to installing a 10' x 20' aluminum carport, attached on the 10' width to a house eave with a 1' slope down the 20' length. No beam is required on the posts for covers up to a 12' width in most areas. If you have any questions, please call us before you begin your installation. 1 888 814-7531
|
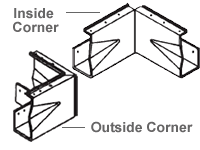
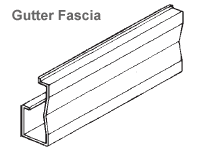
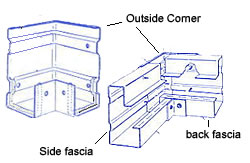
| Dry Fit Gutter Fascia together with outside corners- IMPORTANT: do not caulk the outside corners to the gutter fascia at this time. (this will be taken apart later)
- Slide the corner piece onto one of the gutter fascia pieces and screw together with sheet metal screws.
- Slide another gutter fascia piece into the other end of the corner piece and screw down.
- Continue until all 4 gutter fascia pieces are joined together with the 4 outside corner pieces.
|
|
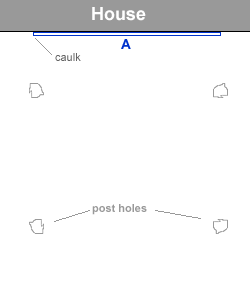
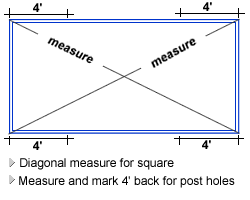 | Place gutter / fascia in place, square and mark for post holes- Position your frame exactly where it will be installed. (if attaching to house eave remember to account for the distance the eave is from the house wall when laying out your framework on the ground)
- Square your frame by measuring diagonaly from corner to corner. Adjust frame until measurements are equal.
- It may be helpful to use a large framing square to double check the corners for square.
- Measure 4' back from each short end and mark the ground, and the frame. This is where you will dig your post holes and attach your post brackets.
- Take the fascia framework apart and place to the side
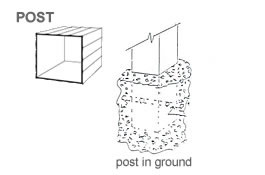
- Dig the post holes.
- All holes should be at least 12in. in diameter and 18 inch deep (or to frost depth). (Local code requirements may be different.... if local code requires other measurements, follow their specifications.)
CAUTION: Do not put concrete in holes at this time. DO NOT INSTALL POSTS ON TOP OF A SLAB. ( if the posts have to be set through a concrete or other type of slab that is already in place, the surface of the slab will have to be broken at the 4 post hole locations. Post holes can then be dug as above.)
|
|
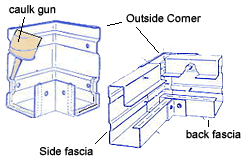
| Attach two Outside corners to Back Gutter Fascia- Find where the rafters (eave attachment*) or studs (wall attachment) are located on the house.
- Mark on the back fascia where the attachment points are and drill holes in the fascia for the attachment screws (wood) or drive pins (masonary). Your back fascia should attach to the house at least every 24".
- Caulk outside corner piece as shown (only caulk the side of the corner piece you will be attaching to the back fascia for now). Slide the corner piece onto the back fascia and screw together with sheet metal screws in pre-punched holes. Repeat for other side of back fascia
- Attach the other two outside corners to the other 10' gutter fascia. (no need to drill holes in this one)
*(for eaves with a backward slope, you may need to cut an angle out of a 2x4 and screw to your eave to give you a flat mounting serface.)
|
|
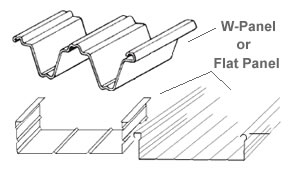
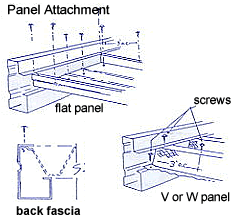
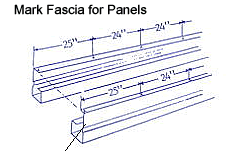 | Mark Fascia for Panel Installation- V Panel, W Panel and Flat Panel are positioned and installed in the same manner
- Place marks on the side fascia in the proper panel increments to keep from misaligning panels - an extra inch is included on the first mark to allow for the side fascia. (24" panel installation shown)
|
|
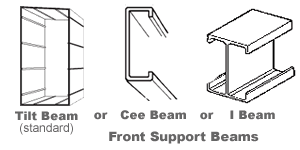
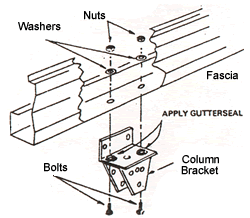 | Install the colum brackets to the underside of long fascia where the posts will go. (use the marks you made when measuring for the post holes.)
|
|
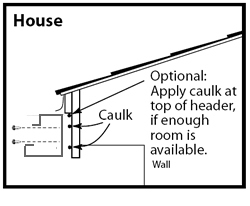 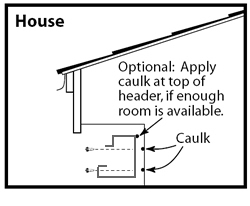  | Attach the gutter fascia to the eave or to a wall. - Mark on the back fascia where the attachment points are and drill holes in the fascia for the attachment lag bolts (wood) or drive pins (masonary). Your back fascia should attach to the house at least every 24".
- Run two beads of caulk along the back surface of the gutter fascia where it will meet the existing building or fascia board.
- If attaching to a masonary wall, use two 1/4" diameter masonry anchors every 12" on center. (Special fasteners for attaching to brick or other non-wood surfaces are not included should be purchased locally. )
- Raise the fascia to the attachment point and fasten one end to the house. (Make sure screws go into rafters or studs at least 1 1/2")
- Place a long level in the center of the fascia, raise the end not fastened until it is level then fasten to house.
- Continue fastening to every rafter, stud or every 12" OC.
 House Eave Attachment image House Eave Attachment image- House Wall Attachment image
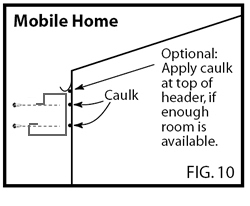
- Mobile Home Attachment image
|
|
| Cut post & put up fascia frame- Have your helper hold one post in the post hole farthest from the house.
- Plumb and level post and hold
- Run a string line from top of gutter lip to post and mark post where line is level.
- Measure down 1' from your mark and cut post (we recommend the post height be no shorter than 7')
(there are many ways to get this measurement, use any way you are comfortable with) - Note: Cutting post - Our installers use a plywood blade turned backwards on circular saw. Be sure to have eye protection, long sleeves and gloves as the debris coming off the post will be hot and sharp.
- Repeat and cut the other post using the opposite post hole
|
|
| Put up fascia gutter frame - Caulk outside corner on left side of gutter fascia (A)
- Put post in post hole and attach gutter fascia (B) to (A) and to Post.
- Brace with temporary supports or have a helper hold post.
- Caulk oustide corner on right side of gutter fascia (A)
- Put post in post hole and attach gutter fascia (C) to (A) and Post.
- Brace with temporary supports or have a another helper hold post.
- Caulk both outside corners on gutter fascia (D)
- Attach (D) to (B) and (C)
- Check level across the (D)
- Adjust post as neccessary to level (be sure to leave about 1' drop from (A) to (D)
- Measure and cut the two back post and attach to post brackets
- Temporarily brace as needed to make framework stable for panel installation.
- (image at right is animated showing the steps above - click here for all steps in one )
|
|
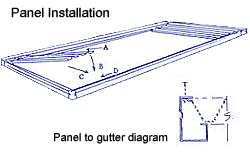
| Install roof panels - With lock side of panel facing back fascia (A in previous diagram), drop end of first panel into fascia (A) and slide in to stop.
- Lower Panel (B) onto lip of opposite fascia.
- Move panel (C) so that front end of panel hangs over the inside lip of side fascia (this allows water to run into the side fascia).
- Move panel (D) so that female side of lock is against wall of fascia (see panel to gutter diagram).
- Attach panel with the self tapping screws to side fascias and back fascia.Leave off the last screw attaching the male lock to the fascia to make it easier to install the next panel. (see diagrams on left)
- Once your first panel is attached place your second panel into position.
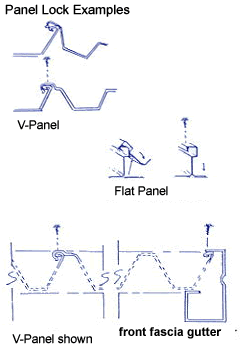
- Continue installing roof panels - locking the panels into place - use the marks you made earlier to line up the end of the panels so you do not get off on the spacing. Panel lock and attachment diagrams
- Important: After placing each panel into position to lock with previousely laid panel, check to be sure the panel ends are even with each other. After the panels have been locked together it is difficult to slide the locked panels for adjustment,
- V and W panels usually snap together by pushing down the female onto the male lock.
- Flat panels: position panel in place to the installed panel. Raise free end up and so the female lock fits into the male lock. Lower panel into place and attach.
- Use your marks to align panel and attach panels together and to facia.
- Repeat procedure until all panels have been installed. (last panel may have to be trimmed to size depending on the width of your cover.)
- Note: These are general installation guidelines for locking the panels into place and may not be the exact procedure for installing the panels on your patio cover.
|
|
| Level posts - cement - attach scuppers or downspouts - Re-check Level and plumb on posts and cover - adjust as needed.
- Once you cover is level and posts are plumb, mix cement and pour into post holes.
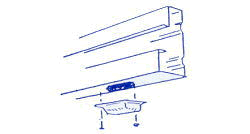
- Drill holes in front fascia where you scuppers or downspouts are going to be attached. (a hole saw works well for this)
- Attach scuppers to underside of front gutter or run downspouts from front gutter back to posts.
- Flashing (purchase at local hardware store) and caulking is required at the attachment points to prevent leaks. Flash at gutter and house wall.
That's it - YOU ARE DONE! Pick up your tools and any screws you mave have dropped, and pop the top on a cold one to celebrate a job well done!
(free standing single carport shown) |
| |
| |
| |